|
|||
|
|||
|
|||
|
|||
|


| Installation | Customization |
|---|---|
Welcome to the help dialog for the Custom Mini-Profile Creator plugin!
Click on any of the tabs above to go through the plugin configuration process!
You can access this menu at any time by clicking on the icon in the bottom right bar (may not be applicable if you're on Forums.net), or you can disable the welcome window and/or the icon by going to Plugins > Manage > Custom Mini-Profile Creator and changing the Show Help option.
Click on any of the tabs above to go through the plugin configuration process!
You can access this menu at any time by clicking on the
 icon in the bottom right bar (may not be applicable if you're on Forums.net), or you can disable the welcome window and/or the icon by going to Plugins > Manage > Custom Mini-Profile Creator and changing the Show Help option.
This step is essential as it gives the plugin everything it needs on the page to get as much profile information as possible.
To make the profile variables work you'll need to add a new line to the very end of Themes > Layout Templates > Mini-Profile and paste the code below on it. The code should be placed completely outside of the mini-profile, so if you're using the default mini-profile template this will be after the very last closing </div> tag. This needs to be done on every theme you have the plugin enabled on as the template is theme-specific.
If your mini-profile template is already customized and you've hit the variable limit for your template you're free to remove any lines from the code below if they contain information that you don't plan on using. For example, if you have no plans to ever add a user's IP to their mini-profile for staff reference you can remove <div class="mp-info ip">$[user.ip]</div> from the code and everything else will still work just fine.
Click to show example

Once you've added the HTML from the Layout Templates tab you're ready to move on to building your mini-profiles. If you want to get going and try some out now or you're not very adept at HTML, CSS, or Javascript, worry not! This plugin includes some examples for you to try out. You're free to skip to the Custom Profile Fields tab and read over this tab later when you're ready to build your own.
Here's a quick rundown of each of the components in Plugins > Manage > Custom Mini-Profile Creator:
Name
This is the name you'll be adding to your custom profile field dropdown once you've finished coding the mini-profile. Pretty self-explanatory. Make sure this name is unique from every other name you use for your mini-profiles or you'll end up overwriting the earlier ones in the list.
HTML
This is the HTML that will go inside your mini-profile. You can use just about any HTML tag here so long as it's appropriate for where the mini-profile is showing on the page. Please refrain from using <style> or <script> tags here. You have the next two sections for that! Also, remember that mini-profiles can show multiple times on the same page, so you shouldn't add ID attributes to any of your elements here. Two elements on the same page cannot have the same ID per HTML standards.
CSS
This is where you'll place what would normally go in your forum's style sheet or what would normally be between <style> tags. Try to code your mini-profile's HTML in a way that will allow you to target it specifically with your selectors. For example, you can surround all of the content in your HTML with a <div> element with a class and target that class and its child elements specifically with your CSS. That way you don't accidentally target every mini-profile on the page with CSS that was meant for the one you're building. One more thing: The forum theme's CSS still applies beforehand, so your mini-profile may look right in one theme but not in another. The best way to circumvent this is to define as many styles as you can to override the theme's CSS.
Javascript
Anything that normally goes between <script> tags will go here. This one's a bit tricky since you'll obviously want to target the custom mini-profile specifically. Luckily there's an easy way to do that. In your statements you can use the $(this) variable to target the mini-profile if you're coding using jQuery. Otherwise, if you only plan on using standard Javascript you can target $(this)[0] instead.
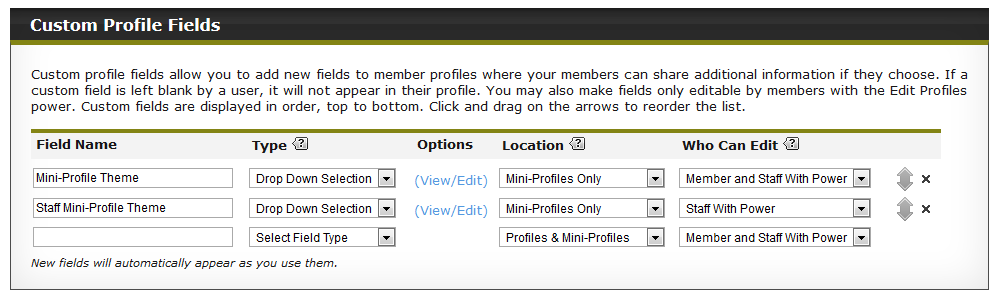
Once you've finished building your mini-profiles it's finally time to add them to the Edit Profile page for use! To enable selection of custom mini-profiles you'll first need to add two specific custom profile fields in Members > Custom Profile Fields in your forum's admin area:
Mini-Profile Theme is for mini-profiles that are designed for member use. You can set the Who Can Edit option for this field to Staff With Power if you only want staff to be able to choose mini-profiles for users. Otherwise, if you want members to freely be able to choose their own mini-profiles you can choose Members and Staff With Power.
Staff Mini-Profile Theme is for mini-profiles designed specifically for staff use. This field is completely optional.
Set the type for both of these fields as Drop Down Selection. Click on the (View/Edit) link to add mini-profile names to each of these fields.
If you've just installed this plugin you should have three different mini-profiles already installed by default: Example 1, Example 2, and Example 3. You can add these to your dropdowns to test them out and see the plugin in action.
Click to show example

- Mini-Profile Theme
- Staff Mini-Profile Theme
Mini-Profile Theme is for mini-profiles that are designed for member use. You can set the Who Can Edit option for this field to Staff With Power if you only want staff to be able to choose mini-profiles for users. Otherwise, if you want members to freely be able to choose their own mini-profiles you can choose Members and Staff With Power.
Staff Mini-Profile Theme is for mini-profiles designed specifically for staff use. This field is completely optional.
Set the type for both of these fields as Drop Down Selection. Click on the (View/Edit) link to add mini-profile names to each of these fields.
If you've just installed this plugin you should have three different mini-profiles already installed by default: Example 1, Example 2, and Example 3. You can add these to your dropdowns to test them out and see the plugin in action.
Click to show example


If you're having trouble getting this plugin to work despite following the instructions in the previous tabs you may want to check that each of your themes meets the prerequisites below in Themes > Layout Templates > Mini-Profile.
First, ensure that opening tag of your mini-profile template includes the $[miniprofile_class] variable in its class. On the default ProBoards theme it should look something like this:
First, ensure that opening tag of your mini-profile template includes the $[miniprofile_class] variable in its class. On the default ProBoards theme it should look something like this:
<div class="$[miniprofile_class]">
Next, make sure that the default {foreach} loop for custom fields is present inside your mini-profile. It doesn't need to be visible, so you're free to add it inside a hidden element if you don't plan on displaying it or if it would mess up the appearance of your own custom template.
{foreach $[user.mini_custom_field]}
<br /><span class="$[user.mini_custom_field.content_class]">$[user.mini_custom_field.name]: $[user.mini_custom_field.value]</span>
{/foreach}
Beyond that you can do whatever you like to the mini-profile template for the most part and it shouldn't negatively impact the plugin.
<br /><span class="$[user.mini_custom_field.content_class]">$[user.mini_custom_field.name]: $[user.mini_custom_field.value]</span>
{/foreach}
The following is a list of available variables for use in the HTML section of the mini-profile creator and their definitions. Adding any of these to a mini-profile will generate the content described in its definition in place of the variable so long as the information that variable outputs is visible to you.
To reference your forum's custom profile fields you can use $[user.customfieldname], substituting "customfieldname" with your custom field's name. You'll need to type the name in all lowercase with no spaces and only use characters A-Z and 0-9.
For example, Mini-Profile Theme becomes $[user.miniprofiletheme]. This will output the value of the custom field. In the case of this example, it'll be the name of the mini-profile theme you've chosen in your profile.
IMPORTANT NOTE: These will only work if you followed the steps in the Installation tab of this window on each of your themes. Any themes that do not include the template code specified there will not have these variables replaced in the mini-profile.
| $[user] | User's display name link. |
| $[user.age] | User's age (if visible to you). |
| $[user.avatar] | User's current avatar. |
| $[user.badges] | User's list of badges. |
| $[user.birthday] | User's date of birth (if visible to you). |
| $[user.color] | Hex color of user's group. If user is not in a group this will return inherit. |
| $[user.custom_title] | User's custom title. |
| $[user.email] | User's email (if visible to you). |
| $[user.gender.image] | Image associated with the gender selected in the user's profile (if available). |
| $[user.gender.text] | Name of gender selected in the user's profile (if available). |
| $[user.group.name] | Name of user's current display group. |
| $[user.group.stars] | Star images associated with user's current display group. |
| $[user.id] | User's numerical ID. |
| $[user.instant_messenger] | User's list of instant messengers specified in their profile (if available). |
| $[user.invisible] | Returns 1 if a user is invisible. More useful for Javascript. |
| $[user.ip] | User's IP address (if visible to you). |
| $[user.is_online] | Returns Member is Online if user is currently online. |
| $[user.is_staff] | Returns 1 if a user is designated as staff. More useful for Javascript. |
| $[user.last_online] | Timestamp showing when user was last online. |
| $[user.likes] | Number of likes this user's posts have received. |
| $[user.location] | Location specified in user's profile. |
| $[user.name] | User's display name in plain text. |
| $[user.personal_text] | User's most recent status. |
| $[user.posts] | User's post count. |
| $[user.rank.name] | User's current posting rank. |
| $[user.rank.stars] | Star images associated with user's current posting rank. |
| $[user.registered_on] | Timestamp showing the date/time the user registered on the forum. |
| $[user.registered_on_short] | Condensed version of user's registration date. |
| $[user.social_network] | User's list of social networks specified in their profile (if available). |
| $[user.username] | Outputs the user's login username in plain text. |
| $[user.warning.bar] | User's warning bar (if it exists). |
| $[user.warning.level] | User's current warning level (if visible to you). |
| $[user.website] | Website specified in user's profile. |
You can utilize the $(this) variable in the Javascript component to target the mini-profile <div> element. For example, if you wanted to add a class to the mini-profile you can use:
Profile variables can also be used in the Javascript component in this plugin. In Javascript the value undefined is used to signify that a value doesn't exist for the variable you've specified. With this in mind you can use profile variables in Javascript conditional statements within the plugin similar to how they're used in the actual layout templates section of the admin area.
Example 1 (variable has value):
Example 2 (variable has no value):
$(this).addClass('class-name-here');
Profile variables can also be used in the Javascript component in this plugin. In Javascript the value undefined is used to signify that a value doesn't exist for the variable you've specified. With this in mind you can use profile variables in Javascript conditional statements within the plugin similar to how they're used in the actual layout templates section of the admin area.
- if(variable) will only run if the variable you specify has a value.
- if(!variable) will only run if the variable you specify has no value.
Example 1 (variable has value):
if(user.group){
$(this).find('.group').show();
}
If the user has their group displayed in their profile the above Javascript would make the HTML below visible if you had it hidden with CSS.
$(this).find('.group').show();
}
<div class="group">$[user.group.name]<br />$[user.group.stars]</div>
Example 2 (variable has no value):
if(!user.gender){
$(this).find('.gender').hide();
}
If the user's gender isn't visible the above Javascript would hide the gender icon generated by the HTML with the "gender" class below.
$(this).find('.gender').hide();
}
<div class="gender">$[user.gender.image]</div>